Tuesday, August 29, 2017

Die Cuts on a Gel Plate; All Hearts Come Home For Christmas; Calligraphic Elements 1


Hi There!!!  It's Wanda here today with a Christmas card to share.

I hadn't had my gel plate out in awhile and could hear it calling my name, lol.  Besides it gives us another wonderful way to use die cuts!!  I had already decided I was going to use the new QF stamp, All Hearts Come Home, and that helped me choose a die cut (Calligraphic Elements 1 heart)  to use as a mask in printing.  

I brayered the 6" x 6" plate with green paints.

Monday, August 28, 2017

Fancy Frame Fairy Mixed Media card

 Hello Crafty Friends!  Kathy Jo here sharing fancy fold frame style card using Quietfire Design's newly released stamp set, A Rustle in the Wind:
A Rustle in the Wind, Set of 4 - Mounted
The card creation process was full of inky fun!  I sprayed several Dylusions Ink Sprays on mixed media paper.  After drying I picked out a section of the paper that reminded me of a mystical night sky.  After cutting it to size, the quote was stamped onto the paper using Jet Black Archival Ink.  Next, Nuvo Crystal Drops were added to give the appearance of stars or other heavenly bodies.
The fairy was stamped onto the mixed media paper and fussy cut.  A triple bow using Sorbet Sari ribbon was created and the fairy was adhered.  Nuvo Crystal Drops were added to the wings.
The image and bow were mounted onto the die cut card base.  More Nuvo Crystal Drops were used on the frame.
Oh- what a fabulous stamp set!  The stamp set pairs perfectly with the other newly released stamp set, Nothing Can Be Truer:
Nothing Can Be Truer, Set of 2 - Mounted

So happy!  Love the gliding fairy...beautiful!

Thanks for stopping by!  I do hope you enjoyed the card.  :)
Have a happy, crafty day!
Big Hugs,
Kathy Jo

Friday, August 25, 2017

A Rustle in the Wind Card - with a woven paper strip background

Hi there, Connie Nichol here today with a quick card featuring one of the new stamps at Quietfire Design, A Rustle in the Wind.  I was feeling very purple this past week.


I couldn't find a lot of purple ink in my stash so I stamped with a Tim Holtz distress ink and used Elizabeth Craft Design stitched circle dies to cut the circles.

For a background, I had lots of patterned paper leftovers, so decided to weave various strips together. This is easiest if you use a removable adhesive to tack down the ends of strips on one side directly on your work surface, then just run paper strips the other way over and under, over and under.  Trim to the appropriate size and tuck under your die cut circles.  It's a fun way to use up paper scraps.  

Here's the new stamp set.  It comes with four beautiful stamps.  I also stamped the fairy and cut her out to use as an extra embellishment tucked into the paper flowers.

Be sure to pop on over to the Quietfire Designs website and check out this and the other new stamps.  So pretty!!

Supplies Used:  Bazzill cardstock, SEI patterned paper, Quietfire Design Stamps, Ranger Ink, Scrapbook Adhesives by 3L tape runner, Petaloo paper flowers.

Thursday, August 24, 2017

Beautiful Snowflakes


Welcome Quietfire friends to our blog today... this week and for the month ahead we are sharing lots of ideas with the newest release of stamps for winter and Christmas.  There are lots of them so it was hard to chose but i picked 2 to create with and i hope that you like them both.

My first card is my favorite because i love, love, love to create with snowflakes.  And Suzanne has created digital papers too so it was really fun to mix and match the patterns.  The colors are gorgeous in lots of pretty shades of blue, white and black and after i stamped and layered my sentiment all it needed was a cute little chipboard snowflake to finish up the theme.


Here is a closeup to see how pretty the sentiment is and anyone would love to get such a sweet card.


And my second card is also a new stamp called "The Best Thing i ever did".  For this one i used the same digital Snowflake papers only i just used the dots in blue and black.  I stamped my image on an oval piece of white to go under the chipboard piece and then layered over that.  This one went together super fast so that is really nice when you need a card in a pinch.


If you would like to see all of the new release check the link HERE.....

And below is my supply list for you all!!


Becca Feeken Marcheline Plume Die set

Gypsy Soul Laser Cuts Oval and Snowflake
Ribbons, twine, rhinestones
white cardstock
Black ink, Navy ink
scissors, paper trimmer
Scrapbook Adhesives by 3L tape runner and 3D Foam Squares


Have a wonderful and very crafty week!

Teresa

Wednesday, August 23, 2017

A Whisper On My Nose and Oxide Background


Hello!  Summer is nearing to an end and we are going to skip right on over to winter here with some new stamps from Quietfire Design.  I am showcasing A Whisper On My Nose.  I used the Sue Wilson Australian Collection to frame the sentiment.  


I wanted different shades of blue for the background so I made an oxide ink background for it.  I used very little ink and the background was very quick to make.


I popped up the frame against the background with foam tape.  
 

Monday, August 21, 2017

In Summer...


Hello everyone, Yvonne here with a new card.

I can't believe how time flies.....we're heading to the end of  Summer here in Holland....the hydrengeas are fading colors and the leaves are about to change color.
So....I made a card to celebrate summer!
Fresh pastel colors and an amazing stamp by Quietfire Design is all one needs :-))

For my card I used the stamp "In Summer" (SKU5997)...I love this quote.
The sentiment is taped upon white cardstock using black  ink and layered some die-cuts.


By using 3D foam squares you get an amazing 3D effect.

And  I added self-adhesive pearls, a satin ribbon and a bow to finish the card.

By the way...did you know that Quietfire Design has lots and lots of gorgeous ribbons?
Click here to see all the yummy ribbons.


Wishing you all a great day,
enjoy the end of summer and
a big warm hug from a Sunny Holland.

Yvonne


Let It Snow - Bright Holiday Words - Nature Is Full of Genius - Box Frame Card


  Yogi here with a box frame card I hope you'll give a try... It has so much potential.

I'm using an  A Way With Word die from Elizabeth Craft Designs "Let It Snow" 3pce set, all also available on Quietfire Design HERE

And I'm using one of the newest quote stamps  from Quietfire Design as well as a sentiment stamp set. ("Nature Is Full of Genius"); ("Bright Holiday Words" 4pce set) 


I created the box using 8" x 10" dark blue Bazzill monochromatic cardstock. I used a 2nd piece of the same cardstock for the cover. (you can use the same or complimentary cardstock) See step by step instructions below. Note: make sure the cardstock you use creases well and doesn't crack on the crease...

Cut an insert piece for the floor from a plain dark blue cardstock. Embossed using Darice "Snowflake Swirl" embossing folder. Lightly hit the high points with Distress "Picket Fence" pad. Adhered to floor (note: if you are stamping directly onto the floor piece, do all stamping prior to adhering to box floor...)


Stamped the quote onto some blue cardstock using the Picket Fence and embossed with white embossing powder. Adhered to floor with 3D foam tape.

Adhered some snowflakes die cut from silver mirror cardstock.


Adhered a silver metallic narrow ribbon to the edges of the box with Sookwang tape, starting and ending with a small piece stuck to the left side edge. (this will be covered with the cover later.) 

On the Inside Cover: Stamped the holiday words using the Picket Fence and the white embossing powder.

Adhered a couple more snowflakes.
On the Front Cover & Assembly:

Die cut the word and snowflakes from the silver mirror cardstock. Adhered to cover.

Stamped some of the snowflakes using the Picket Fence and embossing with Emerald Creek "Iridescent Shimmer" embossing powder.

Adhere the cover to the box. Adhered the snowflake blue gauze ribbon, tied a bow, and adhered the velcro tab. (see instructions below)


Click on any image to enlarge. Enjoy

Here's another option: by making 2 boxes stuck together with a hinge.


STEP 1:

Cut cardstock to 8" x 10"

Note: if using a patterned or textured cardstock (like I am) decide what side you want visible on the frame edge and back. I have the textured side visible therefore I'm scoring my lines on the untextured (or back side) of the cardstock.

Score at ever 1/2" on the 8" side
(1/2"; 1"; 1-1/2"; 2"; 6"; 6-1/2"; 7"; 7-1/2")

Friday, August 18, 2017

Christmas Eve was a Night of Song


I love this quote.  It makes you slow down and read.  Whether you sing or not, it leaves you warmed.  You have a tiny smile on your face.
Christmas Eve was a Night of Song is another of our brand new rubber stamps.  It comes as part of a set with a companion stamp that simply says Merry Christmas. 
I let this gorgeous Bo Bunny Paper do a lot of the "heavy lifting" for me.  I love it's woody, wintery look.  The pink cardstock adds a little pop and the jute twine (left over from bookbinding projects) helped keep that outdoor rustic look. 

Here is how you can make this card!

Thursday, August 17, 2017

A Rustle in the Wind - Fairies!


Some people don't like fairies.  Now I ask you, what's not to like about tiny magical creatures flitting here and there and doing no harm?  I blame my fondness for fairies on my mother....  So if I find a fairy quote I like, sooner or later it will find its way into a rubber stamp!  Here is one of the new ones - it's a set - called A Rustle in the Wind.  The other quote is about magic, so not quite fairies, but close enough!
There is a Fairies Department on the Quietfire site - it's now grown to 5 stamps/sets!

This card is delightfully simple, requiring only some floral designer paper.
Here is how you can make it!

Wednesday, August 16, 2017

A Whisper on My Nose - New Quietfire Snowflakes!


We’re adding to the growing collection of snowflake quotes available on the Quietfire site! I just counted 17 stamps and sets about snow or with snowflakes!   We’re using this new stamp to make a fun card with Distress Oxides. The colours remind you of icy winter days! 
Here is how you can make this card.  I did my best to match the cardstock to the Distress colours.  It took me a while!!

Tuesday, August 15, 2017

Always Lavender


I created this project for the Elizabeth Craft Designs Designer Challenge.  This month the theme is Gift Giving.  Here is a little gift that is fast to make and sweet to give.  You probably already have the dies and an empty shadow frame!  

Instructions:

Monday, August 14, 2017

Nuvo Mousse Resist; It is said that When it is the Darkest; Fiddleheads; Stars


Hello on this wonderful Monday!!!  It's Wanda here today. 

I love resist!!  And it's always fun using something new for that resist.  Today I've used Nuvo Embellishment Mousse as my resist.  I applied the mousse through the star spray using a brush.  You could also use an ink blending tool which would give you a heavier application.  Don't you just love the metallic shine!!?
 

Tuesday, August 8, 2017

Summer Love with markers on Photo Paper

How is your summer going?  I can't believe it is August already.  Kids start school soon and but before that, we get to go shopping for school supplies.  I LOVE school supplies and office supplies.  I do hate having to find just the right colored folders though.  My favorite purchases are markers... so I thought I'd show you a card I did using a new technique I saw on the Tombow facebook page.  It is so incredibly easy and the end result is amazing.  You can see it in the background of this Summer love card here as well as in the words themselves.


I simply scribbled different Tombow markers on a sheet of acetate, spritzed some water over it and pressed the photo paper to it.  Voila - all done!  (I used the blue, green, and purple from the Primary Palette set.)


This is the final result - it dried very quickly.  And the colors just seem to glow off the paper.


I trimmed the paper to fit an A2 card base and added some seashell outline stickers from Elizabeth Craft Designs filled in with ECD silk microfine glitter.  I added a light gray background using a very old Spellbinders die set - Deckled Rectangles so that the words Summer love would not get lost into the background. The words Summer and love were also made from another sheet using the same technique.


A very fun and easy card to make, especially the background.  It's a great way to make your own designer paper with whatever colors you need.


Monday, August 7, 2017

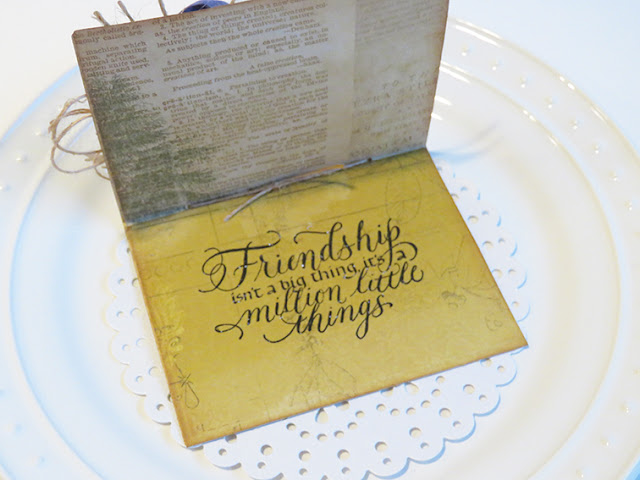
Friendship mini book

Hi Friends and welcome to the Quietfire blog today.  I have a pretty little mini card book to share that i did using a fun piece of watercolor paper that i had in my stash.

Sometimes you just want to tuck in a little something with your gift with a wonderful message to tell the receiver how much you care about them--- so i had this idea to create a little mini card using a book die i had from Becca Feeken.  I used a piece of watercolor paper and the die to cut this design on the outside and layered another piece under the top layer to make the colors pop.  

Then i cut the inside in the yellow part of the paper that you see below.  The stamp that i picked is called "Friendship isn't a big thing".  It was the perfect size and the perfect sentiment to fit inside my mini book.  And then all i had to do was decorate the outside with a pretty flower and some twine.  It's perfect and it went together so quick.


Here is the stamp and the link just in case you need to order one!!


Be sure and check all the new things in the store, it's pretty amazing!

Have a wonderful and crafty day...

Teresa

Tuesday, August 1, 2017

"Baby Love" puppy scrapbook page

Hello Crafty Friends!  Kathy Jo here sharing a sweet scrapbook page of my "baby", Teddy.  That's right, the Baby Love die set is perfect for the furry family members, too!  I adore this cute photo of Teddy and had to create a scrapbook page to remember him as a wee puppy.

The Hearts and Paws Prints Spray stencil was also used on the page.  I used texture paste for the paws...
...and brown archival ink with the hearts.
Did you notice the heart in the "a" in Baby?  Brown ink was used in that heart, too.  So cute!
The layout is adorable with the Baby Love die set and Hearts and Paw Prints stenciled details.  Seeing the page makes my heart happy.  :)
Thank you for stopping by!  I do hope you enjoyed the layout.  Feel free to share your "Baby Love" projects via link below or on the Quietfire Facebook page.  Would be great to see what you create!

Have a happy, crafty day.
Big Hugs,
Kathy Jo
Related Posts Plugin for WordPress, Blogger...